SSH/SFTP with Two Factor Authentication

If you are wanting to access your home network from the Internet, then you really should strongly consider security. Although accessing your servers by using a unique username and a strong password is still very popular there is still a small amount of risk involved. The more you can reduce the risk the better. In this blog I’m going to explain how I access my computers at home from the Internet.

As the title suggests, I use Secure Shell for remote access to either manage my computers (SSH login)  or to shift files backwards and forwards (SFTP). You can find many articles telling you that using an SSH key pair is just like having two factor authentication (2FA), but I prefer to go for the security of a typical username/password login followed by a 2nd authentication using TOTP (Time based One Time Password) with a 2nd device, the 2nd device generally being a mobile phone with an APP (you will also hear this referred to as a soft token).

The first time I installed the SSH daemon (SSHD) with 2FA, I installed SSHD with Google Authenticator. Although it worked fine I couldn’t get it to work with SFTP clients logging into an SFTP jail, so I looked and found an alternative method which I prefer as it is totally Open Source, and of course it did what I wanted. I used PAM_OATH.

Installation & Configuration

My Linux server is Debian based, so here are the steps I did:

  • Install pam_oath and oathtool
    sudo apt-get update
    sudo apt-get upgrade
  • Edited /etc/ssh/sshd_config
    ChallengeResponseAuthentication yes
    UsePAM yes
  • Restart the SSH Daemon
    sudo service sshd restart
  • Now generate a hexadecimal key that will be put into the file users.oath
    head -10 /dev/urandom | md5sum | cut -b 1-30
    this will provide a 30 character result. An example result 8fa4acca0483c5694096ff9d1cc360
    Using this result populate /etc/users.oath with a line like this:
    HOTP/T30/6 yourusername – 8fa4acca0483c5694096ff9d1cc360
    Make sure that /etc/users.oath is only accessible by root, so enter the commands –
    sudo chmod 600 /etc/users.oath
    sudo chown root:root /etc/users.oath
  • Now we need to note the base32 result of the hex key. One can do this using a Hex to Base32 converter, but the recommendation is to use oathtool and issue the command –
    oathtool –verbose –totp  yourhexkey, so using our example hexadecimal key from above,  oathtool –verbose –totp 8fa4acca0483c5694096ff9d1cc360 The result will display, amongst other things,  the line “Base32 secret: R6SKZSQEQPCWSQEW76ORZQ3A”.
  • Now go to your device (most likely your mobile phone) and install the App. I generally use the App Aegis, but you can use Google Authenticator, Authy, FreeOTP, just to name a few. Open the App and add an account. Here are a few pictures to give you an idea of how to add an account using the App “Authy”.
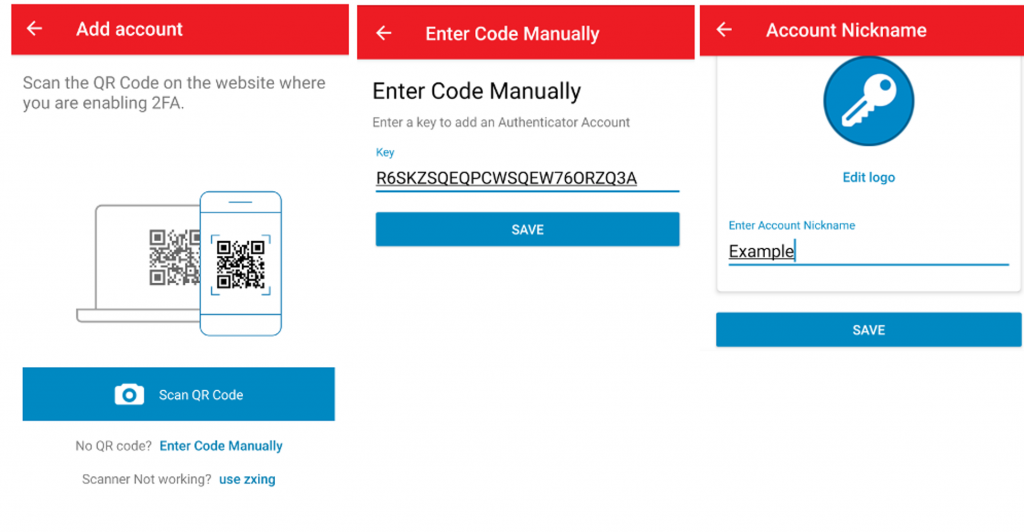
    Note: in “Add account” select “Enter Code Manually”
  • Now we need to activate things. On my Debian based distribution (Raspbian), I editted /etc/pam.d/sshd and added the line –
    auth required pam_oath.so usersfile=/etc/users.oath window=30 digits=6 as the last line.
  • Now it is time to test. Stay logged on to your server just in case you have done things wrong, the follow this procedure:

1. Open a new terminal window on your client device. Your PC, another PC, or Smartphone for example.
2. Open the App on your second device (so mobile phone with Authy, Aegis, GoogleAuthenticator etc.) so you are ready with your Time based OTP.
3. Open a new SSH session from your terminal window to your server and login.

It should look something like this –
ssh username@yourserver
Password:
One-time password (OATH) for `username’:
Last login: Fri Apr 10 13:09:55 2020 from yourhost
username@yourserver:~$

CONGRATULATIONS! It works

  • There is one thing you probably will want to do, and that is to avoid 2FA on your local network(s) for your trusted users. To do this create a file to exclude networks. I created the file /etc/security/access-local.conf and the contents of it are –
    + : ALL : 192.168.1.0/24
    + : ALL : LOCAL
    – : ALL : ALL
    so the network 192.168.1.x and localhost will be excluded.
    To make this active update /etc/pam.d/sshd again by inserting a line just before the line you added above. The last 2 lines will now look like this –
    auth [success=1 default=ignore] pam_access.so accessfile=/etc/security/access-local.conf
    auth required pam_oath.so usersfile=/etc/users.oath window=30 digits=6
    Be sure to test again.

At this point we are basically finished, but it’s really worthwhile fully understanding how it works and the extra configuration options.

For those wanting to know more, I’m going to carry on and show you how to create a user-friendly QR code, and explain why I believe one should add even more security.

Creating a QR

It’s much more user friendly to give your users a QR (Quick Response) code image to scan using their 2nd device/mobile phone. Here is a typical QR code image for my example above with the Base32 secret “R6SKZSQEQPCWSQEW76ORZQ3A”.

This was created with the command qr “otpauth://totp/username@yourserver?secret=R6SKZSQEQPCWSQEW76ORZQ3A” > exampleQR.png

How to Install and execute QR Code Image Generator

I’m sure one could find a nice web-interface to do everything for you, but here I’m going to explain how I generate my QR code.

I have Python  installed on my server so I’m using the Python tools for QR Code Image Generation. For this I will need to install qrcode and pillow. To do this execute the following from the command line –
sudo pip install qrcode (or sudo pip3 install qrcode for Python v3)
sudo pip install pillow (or sudo pip3 install pillow for Python v3)
Now you can make the image with  –
qr “otpauth://totp/username@yourserver?secret=R6SKZSQEQPCWSQEW76ORZQ3A” > exampleQR.png
NOTE: the above is a single line command!
This command is the very basic and a few assumptions are made with this command (e.g. number of digits for the TOTP will be 6 and the time expiration will be 30 seconds).

After you have run the command you just need to display the image, exampleQR.png in our example, and scan it with your App

I’ve given you the basic information that should be good enough to get you going but it’s probably worth your while understanding the URI format of otpauth (e.g. understand “otpauth://totp….” and the parameters).

Additional Security (Fail2Ban)

If you were to look at the number of connection attempts from the Internet you’d be surprised at how many people, robots, are trying to crack your username and password and break into your server. Take a look at how many are attempting to break in with the command –
sudo lastb -a | less
On my SSH server I have attempts from addresses that have been trying for months, so would be trying continually many times a minute if fail2ban were to be inactive. With fail2ban you can ban an IP address after the configured amount of attempts for a configured amount of time.

Fail2ban Installation and Configuration

Installation is very straightforward irrespective of Linux distribution. So for a Debian based distribution just do –
sudo apt-get update
sudo apt-get upgrade
sudo apt-get install fail2ban

If you want to play around with the default configuration of fail2ban then copy fail2ban.conf to fail2ban.local and make changes in this file. The fail2ban.local settings will override the fail2ban.conf settings. I didn’t bother creating a fail2ban.local as I was happy with the default setting for such things as where to place the log files, the verbosity of logging, the file to contain the PID number etc.

Where you will most probably want to play around with the configuration is within jail.conf. To do this copy jail.conf to jail.local sudo cp /etc/fail2ban/jail.conf /etc/fail2ban/jail.local – and change the settings in jail.local. You’ll notice that there are settings for many protocols beside SSH, but we’re only interested in the settings for SSHD. I’m no Fail2ban expert so I’m only going to show you example settings for SSHD which are very similar to what I use –

[sshd]

# To use more aggressive sshd modes set filter parameter “mode” in jail.local:
# normal (default), ddos, extra or aggressive (combines all).
# See “tests/files/logs/sshd” or “filter.d/sshd.conf” for usage example and details.
#mode = normal
enabled = true
filter = sshd
port = ssh
banaction = iptables-multiport
bantime = 60m
maxretry = 2
ignoreip = 192.168.1.0/24
logpath = %(sshd_log)s
backend = %(sshd_backend)s

The only lines that interest me are the lines “bantime”, “maxretry” and “ignoreip”. Using the example above any user within the local network, 192.168.1.0/24 in my example, is excluded. This means they can try numerous times to login. Anyone trying to login from the Internet can enter false credentials 2 times (maxretry), but will be banned from trying for 60 minutes (bantime) if the 3rd attempt is false. Don’t forget to reload the fail2ban configuration after any change –
sudo service fail2ban reload

Further Thoughts and Information

Maybe you are wanting to do 2FA more for your SFTP clients. I haven’t looked that hard for GUI clients that can cope with 2nd authentication, but the popular Windows client, WinSCP, works very well. Unfortunately the popular Linux client, Filezilla, does not handle the 2nd authentication so I always do things from a terminal and CLI on my Linux clients. As for IOS, I haven’t looked for a compatible client.

Finally, if you’re really interested in SFTP, you may want to read my “How to make your own NAS” blog, which covers how to make an SFTP jail.


Apache and Two-factor Authentication (2FA) using LDAP accounts

Introduction

Although I am happy locking down my Apache web server so I can  just use web management tools from my local network, I’m also interested in potentially doing this from the Internet, therefore I decided to try and find a secure way to do this. For several years I just protected my web sites using an LDAP user account and password, which in most cases is most likely good enough. Nevertheless I decided I wanted to add that second layer of security. In this post I will describe how I implemented Two-factored authentication (2FA). If you have no basic Apache web server and/or no basic LDAP know-how then please familiarise yourself with both of these services before proceeding.

Before I start explaining, it’s worth understanding what you are getting as you don’t want to spend a lot of time trying to get things to work and then deciding it’s not what you want. The first authentication is an LDAP authentication using Apache basic authentication, and not a Forms based authentication. What this means is that the LDAP authentication is valid as long as your browser is open, e.g. there is no expiration after so many minutes/hours of inactivity. So if you want session time expiration then this solution is potentially not for you. One can build in some session time expiration on the 2nd Authentication which I will explain later. The 2nd authentication will be done using Time-Based One-Time Password (TOTP), so typically an App on your smartphone like Google Authenticator or Authy (I use an App called Aegis simply because it’s Open Source).

For the know-how for the 2nd Authentication, credit has to go to the person contributing code and instructions to Github. Besides reading my blog you should also read that persons guide! – Apache 2FA instructions.

If you want to take a look at how things work first, feel free to scroll down to the “Let’s try it out” section further down.

Preparation

As I’ve mentioned  please go through the  Apache 2FA instructions, but specifically for my guide you’ll need to do the following commands mentioned in the Apache 2FA instructions:

git clone https://github.com/itemir/apache_2fa
cd apache_2fa
sudo pip3 install onetimepass
mkdir state
sudo chmod 750 state
sudo chmod 640 tokens.json

Enable mod_rewrite, mod_auth_digest and mod_cgid if not already enabled

sudo a2enmod rewrite
sudo a2enmod auth_digest
sudo a2enmod cgid
sudo service apache2 restart

If you want to exactly follow my instructions, then you’ll either have to move the directory apache_2fa and it’s contents to /usr/share/ or make a symbolic link called /usr/share/apache_2fa to point to wherever you placed apache_2fa when you executed the “git” command above.

Finally do:

sudo chmod -R www-data:www-data /usr/share/apache_2fa

Let’s Get Started

My goal is to protect certain parts of my website that I don’t want the public to have access to. In my example, I want to restrict access to https://www.hallam.ch/2fa/ and everything that lies under this URL.

1st Authentication (LDAP)

As previously written, the assumption is, is that you have some basic understanding on how LDAP and Apache services work. To figure out how to implement LDAP basic authentication for Apache please refer to Apache documentation or to the many websites that will detail how to do this. A search using your preferred search engine for “Apache LDAP basic authentication” will help you get going. What I will explain here is how I configured Apache with Basic LDAP authentication to protect my “2fa” web pages.

To configure Apache to protect https://www.hallam.ch/2fa/  I created an Apache configuration file in /etc/apache2/sites-available/ . I called my configuration file “2fa_test.conf” which at the moment is misleading as we are only doing a single LDAP authentication. NOTE: We will be changing the content of “2fa_test.conf” when we finalise things with the 2nd Authentication.

Make sure the file has the correct ownership and permissions so it can be accessed by Apache. The file will have to be present in /etc/apache2/sites-enabled for the directives to be activated on an Apache server restart, so to ensure that the file is in /etc/apache2/sites-enabled from a CLI prompt, execute the command “ln -s /etc/apache2/sites-available/2fa_test.conf /etc/apache2/sites-enabled/2fa_test.conf”.

Don’t forget to reload or restart your Apache web server after any configuration change with “service apache2 reload” (or “service apache2 restart”)

Here is an example of what the “2fa_test.conf” content should look like:

<Directory “/var/www/2fa/”>
SSLRequireSSL
AuthType Basic
AuthName “Please provide your credentials”
AuthBasicProvider ldap
AuthLDAPURL ldap://ldap-server/dc=acme,dc=com?mail?sub
require ldap-group cn=group-test2fa,ou=groups,dc=acme,dc=com
</Directory>

and here the explanation

<Directory “/var/www/2fa/”>  (The directory you are trying to protect)
SSLRequireSSL  (Ensure basic authentication is done using HTTPS)
AuthType Basic
AuthName “Please provide your credentials”  (you can type whatever you want between the quotes)
AuthBasicProvider ldap  (use LDAP for Authentication)
AuthLDAPURL ldap://ldap-server/dc=acme,dc=com?mail?sub (explained below)
require ldap-group cn=group-test2fa,ou=groups,dc=acme,dc=com (explained below)
</Directory>

AuthLDAPURL ldap://ldap-server/dc=acme,dc=com?mail?sub

“ldap-server” is the hostname of where your ldap server is – e.g. localhost, ldap.acme.com.
“dc=acme,dc=com” is where to start searching from for the user you want to authenticate.
“mail”
this is the attribute I have chosen to find the appropriate LDAP entry. I could use. Other attributes that will have a unique value like uid, or for Active Directory UserPrincipalName.
“sub” a tree search of your LDAP server

require ldap-group cn=group-test2fa,ou=groups,dc=acme,dc=com (easier is require valid-user)

The above statement, require ldap-group, is an extra step that authorises anyone who is a member of the LDAP group “group-test2fa” to access the protected web pages. All others have no access. Maybe at this stage you should just use the less restrictive “require valid-user“.

If the above is all a bit too much, then start by looking at the appropriate Apache and LDAP documentation as mentioned.

A lot of you might be happy just with this level of security which would be hard to crack if you use LDAP/TLS.

If things are working fine you should get a dialogue box like this when trying to access https://your-website/2fa/

NOTE VERY WELL: In my example above, it is configured to use LDAP but not LDAP/TLS, therefore if your LDAP server is not on the same box as your Apache server then there is a potential security risk. I actually do have it working with LDAP/TLS so here is an example of what  my 2fa_test.conf would look like (note the extra line “LDAPTrustedGlobalCert that points to you LDAP certificate, and note the “TLS” at the end of the “AuthLDAPURL line):

LDAPTrustedGlobalCert CA_DER “/certs/ldap.crt”

<Directory “/var/www/2fa/”>
SSLRequireSSL
AuthType Basic
AuthName “Please provide your credentials”
AuthBasicProvider ldap
AuthLDAPURL ldap://ldap-server/dc=acme,dc=com?mail?sub TLS
require ldap-group cn=group-test2fa,ou=groups,dc=acme,dc=com
</Directory>

2nd Authentication (TOTP)

This is the harder part for me as I’m a novice regarding the Python programming language (maybe I should learn), and I’ve never really got involved with Apache rewrite rules. Anyhow, I started off by following these instructions, the Apache 2FA instructions. I’m not going to repeat what’s written there so note those instructions and I will outline here what I’ve done differently.

I started by trying to implement exactly the Apache 2FA instructions, but I couldn’t get it to work and I struggled to understand why, maybe because the example given is to achieve something different to what I want to do? As stated right at the beginning, my goal is to restrict access to everything under https://www.hallam.ch/2fa/.

In “1st  Authentication (LDAP)” I explained how I setup “2fa_test.conf”  to configure Apache for LDAP authentication and authorisation. Following is how I’ve now changed “2fa_test.conf”  to accommodate the 1st and 2nd level authentication

<Directory “/usr/share/apache_2fa/”>

SSLRequireSSL
AuthType Basic
AuthName “2FA First Authentication”
AuthBasicProvider ldap
AuthLDAPURL ldap://localhost/dc=local,dc=net?mail?sub
require ldap-group cn=group-test2fa,ou=groups,dc=local,dc=net

</Directory>

ScriptAlias /auth/ /usr/share/apache_2fa/

<Directory “/var/www/2fa/”>

RewriteEngine On

RewriteCond %{REQUEST_URI} !^/auth/
RewriteCond %{HTTP_COOKIE} !^.*2FA_Auth=([a-zA-Z0-9]+)
RewriteRule ^(.*)$ /auth/auth?%{REQUEST_URI} [L,R=302]

RewriteCond %{REQUEST_URI} !^/auth/
RewriteCond %{HTTP_COOKIE} ^.*2FA_Auth=([a-zA-Z0-9]+)
RewriteCond /usr/share/apache_2fa/state/%1 !-f
RewriteRule ^(.*)$ /auth/auth?%{REQUEST_URI} [L,R=302]

SSLRequireSSL
AuthType Basic
AuthName “2FA First Authentication”
AuthBasicProvider ldap
AuthLDAPURL ldap://localhost/dc=local,dc=net?mail?sub
require ldap-group cn=group-test2fa,ou=groups,dc=local,dc=net

</Directory>

Let’s go through the configuration.

<Directory “/usr/share/apache_2fa/”>

/usr/share/apache_2fa  is where I’ve put the downloaded code (the code downloaded with the command git clone https://github.com/itemir/apache_2fa).

The directives from “<Directory “/usr/share/apache_2fa/”>” to “</Directory>” I explained in the 1st Authentication (LDAP) section.

ScriptAlias /auth/ /usr/share/apache_2fa/

This forces Apache  to get all the HTML code and scripts for https://www.hallam.ch/auth/ from  /usr/share/apache_2fa/ . Please note that the web server does not have have a directory called “auth” (e.g. you won’t find a directory “<DocumentRoot>/auth”, in my case “/var/www/auth”). When you read the next part on the rewrite rules it will hopefully become clear what is happening.

<Directory “/var/www/2fa/”> (The directory you are trying to protect, but rewriting will take place when I enter https://www.hallam.ch/2fa/ in my web-browser as you will see).

RewriteEngine On (Should be self-explanatory)

RewriteCond %{REQUEST_URI} !^/auth/
RewriteCond %{HTTP_COOKIE} !^.*2FA_Auth=([a-zA-Z0-9]+)
RewriteRule ^(.*)$ /auth/auth?%{REQUEST_URI} [L,R=302]

To fully understand the above 3 lines please read the Apache documentation rewrite rules. Basically it states if the “RewriteCond” conditions are met it will execute the “RewriteRule“.  The following explanation might well be good enough for you.
The first Rewrite Condition “RewriteCond %{REQUEST_URI} !^/auth/“. If the requested URI is not “/auth/”. It won’t be initially as it will be “/2fa/” (https://www.hallam.ch/2fa/).
The second Rewrite Condition “RewriteCond %{HTTP_COOKIE} !^.*2FA_Auth=([a-zA-Z0-9]+)” is basically checking whether the Cookie “2FA_Auth” does not exist. Initially it won’t.
Assuming the Rewrite Conditions are met the Rewrite Rule will execute RewriteRule ^(.*)$ /auth/auth?%{REQUEST_URI} [L,R=302]
This will cause the Apache server to execute https://www.hallam.ch/auth/auth?/2fa/ – do you remember the line “ScriptAlias /auth/ /usr/share/apache_2fa/” from above? What happens is that Apache goes to /usr/share/apache_2fa/ and executes the python script “auth”. The python program uses everything after the “?”, so /2fa/ in my case – https://www.hallam.ch/auth/auth?/2fa/.

I’m not going to show you the “auth” python script and I’m not going into details on what the “auth” script does. You can always get the code from Github. What I will tell you about the “auth” python script is that it creates a cookie with an expiration time and a file in the directory /usr/share/apache_2fa/state/. The filename is the same as the cookie value. I’ve explained this because of the next part of the rewrite rules.

RewriteCond %{REQUEST_URI} !^/auth/
RewriteCond %{HTTP_COOKIE} ^.*2FA_Auth=([a-zA-Z0-9]+)
RewriteCond /usr/share/apache_2fa/state/%1 !-f
RewriteRule ^(.*)$ /auth/auth?%{REQUEST_URI} [L,R=302]

Let’s go straight to the second rewrite condition as I’ve already explained the first.
The second rewrite condition practically the same as as the second rewrite condition above except this time it is checking whether the cookie “2FA_Auth” exist.
The third rewrite condition RewriteCond /usr/share/apache_2fa/state/%1 !-f is looking to see if there is not a file that matches the cookie value under “/usr/share/apache_2fa/state/”.
The RewriteRule has also previously been explained.

PLEASE NOTE: I’ve also included further directives after the rewrite rules (a repeat of the directives in the 1st authentication). I believe these directives are superfluous and you can exclude them. I only put them there because that’s how things were setup in the Apache 2FA instructions, and leaving them there is harmless.

Generating secret keys and QR codes

I don’t intend to go into too much detail, but will tell you enough for you to get things working. For the generation of the secret keys one just needs to issue this CLI command:

“head -10 /dev/urandom | md5sum | cut -b 1-30 | xargs oathtool –verbose –totp | grep “Base32” | cut -b 16-“

This will give a result of something like this – TBSYABA5VOLRMYWSF5SGTTY5

you will then need to put the result into the “tokens.json” file which you’ll find under /usr/share/apache_2fa. I’ve done things for a user with the email address of “test.user@acme.com” so my “tokens.json” file looks like this

{
“test.user@acme.com”: “TBSYABA5VOLRMYWSF5SGTTY5”
}

You can leave things like this and tell the user what their secret key is so they can add it to the Mobile phone App, or you can be a bit more user-friendly and generate a QR code for their Mobile phone App to scan in.

To generate the QR code using the above secret key enter the following CLI command (NOTE: it’s a single line command):

qr “otpauth://totp/test.user@acme.com?secret=TBSYABA5VOLRMYWSF5SGTTY5”

You can always save the QR generate to an image file by saving the output, so:

qr “otpauth://totp/test.user@acme.com?secret=TBSYABA5VOLRMYWSF5SGTTY5” > testuser.png

Let’s try it out

So you can see how it should work for you, I have set things up so you can access what’s behind https://www.hallam.ch/2fa/ .

To start with you will need an App on your smartphone for the 2nd authentication. I am using an Open Source App called “Aegis”, but if you want you can use Apps like “Authy” or “Google Authenticator”. You can add a new profile by adding the Authentication secret key manually which is TBSYABA5VOLRMYWSF5SGTTY5, but you’ll probably find it easier to just scan the QR code that I generated which you will find here – https://www.hallam.ch/QRcode/ .

You are now ready to go, so go to https://www.hallam.ch/2fa/ and when the dialogue box appears for “User Name” and “Password” enter the following credentials:
User Name = test.user@acme.com
Password =  testuserxx

Assuming you have entered the credential correctly you will get the page for the 2nd Authentication for the TOTP code from your smartphone App.

Enter the token value that is presented by your smartphone App (Authy, Google Authenticator, Aegis etc.) and you should see the following page.

Additional thoughts and information

  • Take a look at the python script auth (in my case /usr/share/apache_2fa/auth), and try and figure out what it’s doing. The beauty about auth is that you can play around with it to meet your needs.
  • I made a small change to the template.html to use my own image for the 2nd Authentication instead of getting the *Google Authenticator” image from the Internet.
  • If you want to protect another part of your website with this solution, you’ll have to think a bit. For example, you won’t want to use the same cookie generate by the auth script is an immediate thought.
  • You can put a bit of session control in place by changing the expiration time of the 2FA_Auth cookie that auth generates, and maybe one would like to change auth so that the cookie expiration time is updated everytime the website is accessed. If you have a short expiration time, auth will force the 2nd Authentication to take place again. Current expiration time is 6 hours.
  • Don’t forget to implement the latter part of the Maintenance section of Apache 2FA instructions (the state clean part).
  • You can play around with solution to fit your need. For example, it might be nice to keep the tokens within your LDAP directory instead of the file “tokens.json”.
  • Maybe I should spend some of my time to come up with a “Forms Based” 2FA using PHP 🙂